News

Créme Brulée Pumpkin Pie

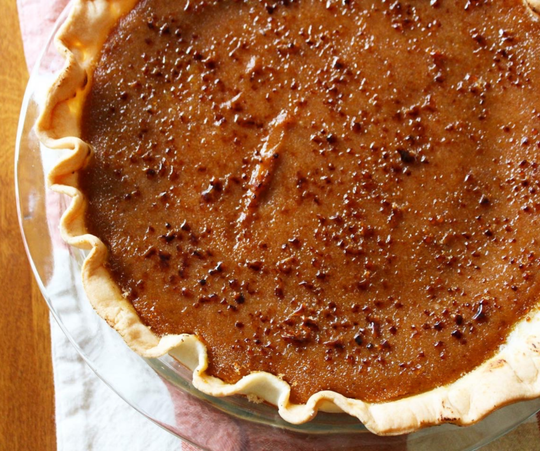
The holiday season wouldn’t be complete without looking forward to the desserts you make while spending time with the ones you love right there in the kitchen with you. Pumpkin pie is of course one of the most classic traditions when it comes to Thanksgiving. This year at Baketivity we put a special twist on the traditional pumpkin pie and we hope that you find a time to bake it and enjoy in each of your homes. From our kitchen to yours we hope that this Créme Brulée Pumpkin Pie with a sweet, toasted, and crackly top accompanied by the familiar flavors of a classic pumpkin pie bring you and your loved ones happiness this season. Remember the importance of encouraging your little ones to help you in the kitchen whether it be scooping and measuring ingredients, being a mixer, or rolling out dough. This recipe is super simple and is perfect for having your little sous chef helping you each step of the way creating memories no one will forget. Let’s get started!Pie Dough Recipe;
  • 1 1/4 cups of all-purpose flour
  • 1/2 tsp. salt
  • 1/2 cup butter, cold and diced
  • 1/4 cup (plus 2-3 tsp. if needed) cold water
Directions; Start by combining your flour and salt into a large mixing bowl. Go ahead and and cut in your cold butter until it resembles little crumbs. Cutting in butter just means incorporating your butter using a pastry cutter or fork if you don't have one. Stir in your water 1 tsp. at a time until your mixture comes together to form a ball. Bring your dough onto the counter and softly form your dough into a disk shape. Now it's time to wrap your dough in plastic wrap and refrigerate for 3 hours or overnight. Once you've let your dough chill go ahead and roll it out to fit your pie dish. Place it evenly on your dish and press onto the sides and bottom making sure it is covering the dish evenly. If the sides are overflowing on your dish take a pair of kitchen scissors and trim the edges. That's it, let's make the filling! Pumpkin Pie Filling Recipe;
  • 1/2 cup white sugar
  • 1/2 cup brown sugar
  • 3 Tbs. all purpose flour
  • 1/2 tsp. salt
  • 1 tsp. ginger
  • 1/4 tsp. cloves
  • 1/8 tsp. cardamom
  • 1/2 tsp. nutmeg
  • 2 tsp. cinnamon
  • 2 cans pumpkin puree (30 oz.)
  • 2 large eggs
  • 2 large egg yolks
  • 1 1/4 cups of cream
  • 4-5 tsp. fine sugar (for the créme brulée effect on top)
Directions; Preheat your oven to 425 degrees F. In a large mixing bowl combine your white sugar, brown sugar, flour, salt, and all of the spices. Add the pumpkin puree, eggs and egg yolks, and the cream. Combine everything with a whisk until there are no lumps and your batter is nice and smooth. Once everything is combined, go ahead and pour your batter into the prepared pie dish. Before you put your pie in the oven cover the edges of your crust with tin foil so you can avoid them being over-baked. Bake your pie for 12 minutes at 425 degrees F. After you have baked your pie for 12 minutes at 425 degrees F, lower the temperature to 350 degrees F and bake for about 35-40 minutes. When you go to check on the pie don't be alarmed if the middle isn't set yet. It shouldn't be! So you are on the right track. When you look at your pie in the oven the outer 2 inches closest to your crust should not be jiggly when you shake your dish. Keep your pie in the oven! This is super important. After the 35-40 minutes turn your oven off and open the oven door just a crack to let the pie come to room temperature on it's own. Once your pie has come to room temperature go ahead and refrigerate for 2-3 hours or overnight. When you are ready to serve the pie sprinkle the white sugar over the top of your pie. Using a kitchen torch go over the top of the pie making the sugar toasted giving it the créme brulée touch. It will start to sizzle and brown. Make sure to avoid the crust to avoid burning it. If you do not have a kitchen torch, put your oven on high broil and cover your crust with tin foil again and keep an eye on it the whole time in the oven taking it out as soon as the sugar browns. Things can burn very quickly on broil so don't take your eyes off the pie at this point. You did it! We hope you enjoy this twist on the traditional pumpkin pie. If you have any questions always feel free to reach out to us on social media or join our Baketivity Facebook group page to see more recipes, have interactive conversations with our baker, or just be part of our community...we would love to have you. Happy Holidays from our family to yours.

Frequently asked questions

What comes in a Baketivity baking kit?

Each Baketivity baking kit includes pre-measured dry ingredients, easy step-by-step instructions, and fun educational activities designed for kids. Our recipes are created to help children learn real kitchen skills while baking something delicious with their family.

Do I need to buy additional ingredients?

You may only need to add a few fresh ingredients like eggs, butter, or milk, depending on the recipe. Most of the dry ingredients come pre-measured in the kit, making baking simple, convenient, and mess-free for kids.

What equipment do I need to use the baking kits?

Most families already have everything they need at home. Typically you'll need mixing bowls, a whisk, fork or spoon, measuring cups, and a lined baking pan. Some recipes may also require a microwave-safe bowl or oven.

What age are Baketivity baking kits best for?

Baketivity baking kits are designed for kids ages 4–16. Younger children may need a little help from a parent, while older kids can follow the instructions more independently and build confidence in the kitchen.

Do your baking kits contain nuts?

Nuts are not directly included in the recipes or ingredient lists. However, some components may be produced in facilities that also process nuts, sesame seeds, soy, and gluten, so trace amounts may be present.

Are Baketivity baking kits kosher?

Yes! All ingredients included in Baketivity baking kits are OU-certified kosher, and our facility is FDA-approved, so families can bake and enjoy their treats with confidence.

My ingredients feel hard or clumpy. Is that normal?

Yes! Our ingredients are vacuum-packed to keep them fresh, which can sometimes make them feel firm or clumpy. Simply open the bag and give it a shake, and the ingredients will loosen up and be ready to use.

You might also like

Holiday Baking Traditions & Timeless Family Recipes

Holiday Baking Traditions & Timeless Family Recipes

Discover the heartwarming history behind holiday baking traditions. Learn how to keep family recipes alive, explore global festive treats, and create lasting memories in the kitchen this season.

View more
Holiday Cooking Challenges for Kids: Tips for Stress-Free Fun

Holiday Cooking Challenges for Kids: Tips for Stress-Free Fun

Cooking with kids during the holidays doesn't have to be stressful! Discover actionable tips to manage the mess, overcome kitchen challenges, and create joyful, fun-filled family memories.  

View more
20 Creative Homemade Christmas Gifts Kids Can Make

20 Creative Homemade Christmas Gifts Kids Can Make

Spread holiday cheer with 20 easy, budget-friendly homemade Christmas gifts kids can craft and bake themselves.

View more
Festive Holiday Cookie Exchange Ideas, Tips & Themes

Festive Holiday Cookie Exchange Ideas, Tips & Themes

Host the ultimate festive gathering this year! Discover creative recipes, planning tips, and fun themes to make your holiday cookie exchange a sweet and memorable success for everyone.  

View more
15 Irresistible No-Bake Christmas Desserts

15 Irresistible No-Bake Christmas Desserts

Skip the oven this year! Discover 15 quick, easy, and festive no-bake Christmas desserts that will save you time and keep the kitchen stress-free.

View more
Festive Drinks for Kids: Fun & Easy Holiday Recipes

Festive Drinks for Kids: Fun & Easy Holiday Recipes

Make the holidays magical for your little ones! Discover fun, colorful, and easy festive drinks for kids, from creamy hot cocoa to sparkling holiday mocktails.  

View more