News

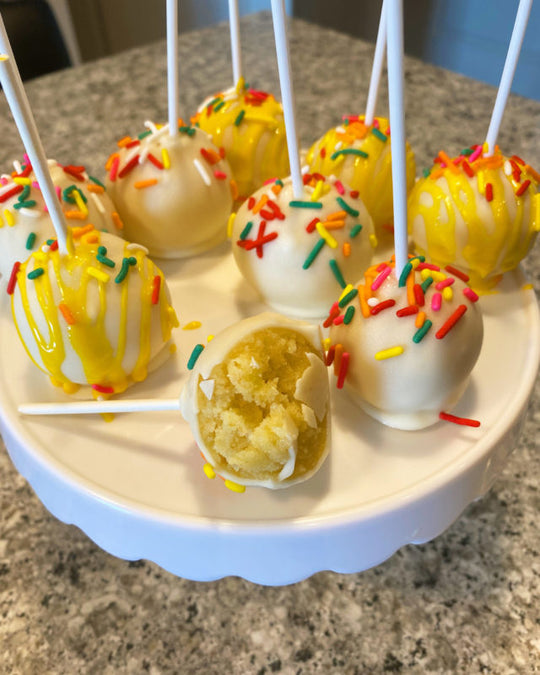
Vanilla Summertime Cake Pops

Recipe:
  • ½ cup flour
  • ½ tsp. Baking powder
  • ¼ tsp. Salt
  • 1 egg
  • ½ cup sugar
  • 2 Tbsp. unsatled butter
  • ¼ cup milk
  • 2 tsp. Vanilla extract
  • ½ tsp. Veg oil
  • 1 cup white candy melts
Buttercream:
  • 3 Tbsp. Butter
  • 1 cup 3 Tbsp. powdered sugar (5.2oz)
  • 1 Tbsp. milk
Directions:
  1. Wash your hands and preheat the oven to 350° F.
  2. In a medium sized bowl whisk together the flour, baking powder and salt then set aside.
  3. In a separate bowl whisk together 1 egg, oil, sugar and vanilla extract.
  4. In a microwave safe bowl or a stove top pot, melt together ¼ cup of milk and 2 Tbsp. of butter. Stir this mixture together to cool it down before adding it to the sugar and egg mixture.
  5. Add the milk and butter into the sugar and egg mixture and whisk until everything is nicely combined.
  6. Slowly pour in the dry ingredients, continuing to whisk until the batter is nice and smooth.
  7. Pour the batter into a greased cake pan and bake for 12-15 minutes.
  8. While the cake is in the oven we can prepare the buttercream. In a medium sized bowl cream together 3 Tbsp. of butter and the powdered sugar. Use a fork to combine these two ingredients.
  9. Once your butter is in small pea sized pieces, add in 1 Tbsp. of milk and continue to mix using the fork until there are no lumps. Once fully combined, add the vanilla sugar.
  10. Once the cake is out of the oven and has cooled for about 10 minutes, use a fork to crumble the cake. You may use your hands to crumble the cake but make sure that it isn’t too hot before you do.
  11. Now that the cake is broken down, add in the buttercream and combine well.
  12. Prepare a cookie sheet with parchment paper to lay your cake pops on.
  13. Using a 1 Tbsp. measuring spoon, scoop a hefty tablespoon of cake and roll into a ball. Insert a cake pop stick in each one.
  14. Put the cake pops the freezer to set for 1 hour.
  15. Just before it is time for the cake pops to come out of the freezer, melt the white candy melts. Dip the cake pops gently into the white candies and coat the entire thing. Continue this process until all of the cake pops are coated.
  16. Add sprinkles, colored candy melts, candy etc. to make them your own :)
  17. Enjoy!

Frequently asked questions

What comes in a Baketivity baking kit?

Each Baketivity baking kit includes pre-measured dry ingredients, easy step-by-step instructions, and fun educational activities designed for kids. Our recipes are created to help children learn real kitchen skills while baking something delicious with their family.

Do I need to buy additional ingredients?

You may only need to add a few fresh ingredients like eggs, butter, or milk, depending on the recipe. Most of the dry ingredients come pre-measured in the kit, making baking simple, convenient, and mess-free for kids.

What equipment do I need to use the baking kits?

Most families already have everything they need at home. Typically you'll need mixing bowls, a whisk, fork or spoon, measuring cups, and a lined baking pan. Some recipes may also require a microwave-safe bowl or oven.

What age are Baketivity baking kits best for?

Baketivity baking kits are designed for kids ages 4–16. Younger children may need a little help from a parent, while older kids can follow the instructions more independently and build confidence in the kitchen.

Do your baking kits contain nuts?

Nuts are not directly included in the recipes or ingredient lists. However, some components may be produced in facilities that also process nuts, sesame seeds, soy, and gluten, so trace amounts may be present.

Are Baketivity baking kits kosher?

Yes! All ingredients included in Baketivity baking kits are OU-certified kosher, and our facility is FDA-approved, so families can bake and enjoy their treats with confidence.

My ingredients feel hard or clumpy. Is that normal?

Yes! Our ingredients are vacuum-packed to keep them fresh, which can sometimes make them feel firm or clumpy. Simply open the bag and give it a shake, and the ingredients will loosen up and be ready to use.

You might also like

Holiday Baking Traditions & Timeless Family Recipes

Holiday Baking Traditions & Timeless Family Recipes

Discover the heartwarming history behind holiday baking traditions. Learn how to keep family recipes alive, explore global festive treats, and create lasting memories in the kitchen this season.

View more
Holiday Cooking Challenges for Kids: Tips for Stress-Free Fun

Holiday Cooking Challenges for Kids: Tips for Stress-Free Fun

Cooking with kids during the holidays doesn't have to be stressful! Discover actionable tips to manage the mess, overcome kitchen challenges, and create joyful, fun-filled family memories.  

View more
20 Creative Homemade Christmas Gifts Kids Can Make

20 Creative Homemade Christmas Gifts Kids Can Make

Spread holiday cheer with 20 easy, budget-friendly homemade Christmas gifts kids can craft and bake themselves.

View more
Festive Holiday Cookie Exchange Ideas, Tips & Themes

Festive Holiday Cookie Exchange Ideas, Tips & Themes

Host the ultimate festive gathering this year! Discover creative recipes, planning tips, and fun themes to make your holiday cookie exchange a sweet and memorable success for everyone.  

View more
15 Irresistible No-Bake Christmas Desserts

15 Irresistible No-Bake Christmas Desserts

Skip the oven this year! Discover 15 quick, easy, and festive no-bake Christmas desserts that will save you time and keep the kitchen stress-free.

View more
Festive Drinks for Kids: Fun & Easy Holiday Recipes

Festive Drinks for Kids: Fun & Easy Holiday Recipes

Make the holidays magical for your little ones! Discover fun, colorful, and easy festive drinks for kids, from creamy hot cocoa to sparkling holiday mocktails.  

View more